Showing posts with label polish. Show all posts

Saturday, April 13, 2013

An Update.

Hello All!

It has been so long. Our life has been a whirlwind these past months. Life gave us lemons, and we tried making lemonade, but sometimes there were just too many lemons. Hehe. Long story short, we had to move and make a lot of financial adjustments, but we're making do and doing much better.

 I just wanted to post what my nails have looked like the past few months, as I try to get back into the swing of things again. Here's to the first of many more posts to come!


Monday, June 11, 2012

Day 16 - Tribal Nails!

Wow, Day 16 already. My 31 Day Nail Challenge, journey has passed the half way mark. I was actually nervous about tribal, but once I had a plan and started it, it was smooth sailing all the way. I am incredibly happy with these nails, and can not wait to try out different patterns and colors in the future.

I used 6 colors all together. One color for each finger nail (as a base coat) and black polish to draw on the patterns.


To make it easier, for all of us, I'll list what I used finger by finger.

Thumb: I used  Pure Ice Wild Thing as the base coat, Pure Ice Splash as the stripe down the middle and  Kiss Nail Art Paint in Black for the details.

Pointer finger: I used Sally Hansen Hard as Nails Xtreme Wear, Mellow Yellow as the base coat,  Sally Hansen's  Hard as Nails Xtreme Wear, Sun Kissed is painted on half the nail, and Kiss Nail Art Paint in Black for the details.

Middle finger:  Milani Neon Dude Blue as the base coat, and  Pure Ice Splash as the stripe down the middle. Kiss Nail Art Paint in Black for the details.

Ring finger:  Pure Ice Splash as the base coat and Kiss Nail Art Paint in Black as the details.

Pinky finger:  Sally Hansen's  Hard as Nails Xtreme Wear, Sun Kissed as the base coat and Kiss Nail Art Paint in Black for details.

Hope you all like them as much as I do. Trust me they look so much harder than they actually are. Try it out, it may just be your new favorite design!

Friday, June 8, 2012

Day 15 - Delicate Print!

Hello, again! I realize I'm a day later than I said I would be, but I'm happy I finally accomplished delicate print! It was a real doozy. At first my vision was to do some sort of stamping, but I really need to practice stamping more. I've watched tons of tutorials, and still can not achieve what I want. Anyway, I'll figure it out someday. So with delicate print I went more literal, and did comic book nails! Hey, I'd describe the pages of an Archie comic book to be delicate print, wouldn't you? Haha.


They're no where near perfect, but they're fun. I used Jordana French Tip white as the base coat. Allowed it to dry, and poured rubbing alcohol in a shot glass. I dipped a finger in for 30 seconds, stuck on the newsprint and pressed firmly down for another 30 seconds, the slowly pealed the newsprint off. Once each finger was done (and dry, very important) I used my favorite Seche Vite Top Coat.

Saturday, June 2, 2012

Day 14 - Flowers!

As I have gotten further along in this 31 Day Nail Challenge, the more intricate the challenges get. Because of this I have decided to do my nails every other day, or every few days. Just so I can enjoy my hard works a few days before removing and starting the next challenge.

At this point in the challenge it's safe to say that each challenge from here on out will be a new experience for me. Well besides water marbling, but that was such a fail that I still can't say I have much experience in that one either. Haha. So I took to the web, to research flowers, and how to tutorials. It was NailNerd.com : How to Paint Rose on Your Nails that caught my eye and gave me the know how to do what I had imagined on my nails.


Light Blue & Pink Spring Vintage Flower Nails

I used Wet n Wild Megalast I need a Re-Fresh Mint as the base coat. Took about 3 coats. I dabbed the flowers on my nails with Pure Ice Gossip! and drew in the details with Sally Hansen, Hard as Nails, Hard-core Party. For the leafs I used Pure Ice Wild Thing, and a un-marked bottle in a grass green color. 

Thursday, May 31, 2012

Day 13 - Animal Print!

Hello all. My finger is feeling better, so I was able to remove the stripe nails (Finally!) and move on to animal print. I'm not a huge animal print fan. I like it, but rarely do I wear it. My favorite is leopard, well I also really love peacock feathers if that is considered animal print. Anyway, I am a little more wild when it comes to my nails, in comparison to my wardrobe, so leopard print is actually one of my favorite things to do on my nails (at least at the moment.).

Here's the polishes I used in order.


I used the white as a base coat. Then painted the Wet n Wild Megalast Break the Ice on top, let that dry completely. I painted the  Sally Hansen Hard as Nails Xtreme Wear Golden-I  on a cosmetic sponge wedge and "sponged" the tips and mid section of my nail creating a pearl and gold gradient. I used the Kiss Black polish to draw on the spots with a small sized nail dotter, and used the Kiss Silver to fill in the spots. Lastly the Seche Vite Top Coat to finish 'em off. 


Wild About Polish


Tuesday, May 29, 2012

Day 12 - Stripes!

Hello All! Like most of these challenges I did not have any experience with painting stripes on my nails. So I decided to wing it.


As the base coat I used Wet n Wild Megalast Wet Cement. Which, by the way, I LOVE. The second color I used was Salon Perfect Sour Apple on every nail but the accent finger, in which I used Wet n Wild Megalast Through the Grapevine


Finally I used Kiss Nail Artist Paint & Stencil kit White Polish to draw the white line down the middle.


I'm happy with them, nice and simple. 

Monday, May 28, 2012

Day 11 - Polka Dots!

As I said in my Gradient challenge post, I decided to give my nails a bit of a rest and add polka dots on to my gradient nails. To see what I did for the gradient challenge click here.

I got smart and made a step by step on a sheet of paper, instead of having to explain the steps I took to create the polka dot look. I have never done polka dot nails. I tried several techniques I found online, and the one I demonstrated worked out way better than the other ones.


I used Kiss Nail Art in Black, and the biggest nail dotter I have. 

Here's my results. I'm super happy with the way they turned out. Tomorrow, stripes! Oooh the possibilities. 


Sunday, May 27, 2012

Day 10 - Gradient!

Phew. Finally starting to feel like I'm getting back into the swing of things. This was my second time ever doing gradient. I used Sally Hansen Hard as Nails, Hard-core Party as the base coat. The base coat took about 3 coats, to get it thick enough. Once the base coat fully dried, I dunked a cosmetic sponge in water and then used Pure Ice Gossip! to sponge on the gradient tip. And finished with Seche Vite Top Coat.


I am so so happy with the way they turned out! Tomorrow is polka dot, and I think I am just going to add on from this one, because my nails are still sore from removing the metallic challenge, and attempting too many rainbow nails. Hope ya'll are having a great Memorial Day weekend!

Oh and please become a fan of Wild About Polish's Facebook page.

Saturday, May 26, 2012

Day 9 - Rainbow Nails

Ugh, it's only thing I can think of to describe this challenge. I had tons of ideas, none of which turned out as I would have liked. I basically settled while thinking over and over again "Tomorrow is a new day!".

While I did strive to do this and post it yesterday, after hours of removing the glitter from Day 8, and several failed attempt at the rainbow looks I had in mind, I lost all motivation to carry on until finished. Instead I went to bed, woke up and did everything I could the achieve victory.

 I used 9 different polishes, and took a photo of them instead of having to list each of them, which I will post along with my finished product. I ended up painting my nails white, and using a toothpick to drag along each color creating the "rainbow". I then added 2 glitter polishes to the bottom of my nail to do a sparkle cloud effect.


Boy am I glad Day 9 is over. Next up is gradient, fingers crossed it works out!

Wednesday, May 23, 2012

Day 8 - Metallic!

Greetings from Ventura, California! The weather is amazing, and I am sad to be heading back tomorrow. But we've spent some time on the beach, tried some amazing food and took some time to shop. I did these nails the  night before we left for this trip and they'v e held up really well. I wish the camera would capture how good the glitter looks, but oh well.


The base coat is Sally Hansen's Hard as Nails Xtreme Wear in Golden-I. With the glitter I chose to paint the tips of each nail, besides the accent nail that I painted entirely. I used Jordana Glitters Funky Town Gold. And finished it up with Seche Vite Top Coat

Oh, and here's a photo I took of the nails fresh. Like I said it was night, so I was taking the photo on my bed, and this is the exact reason why I take nail photos outside. Meet my cat Desi.


Well we have a 9 hour long drive tomorrow, and want to make the most of the time we have left here. I am planning on doing Day 9 on Friday and posting it then. Have a fabulous evening.


Saturday, May 19, 2012

Day 7 - Black and White!

I have to say this challenge has really been a great experience so far. There's still 24 days left, but I really feel that this has helped my skill immensely already.

I'm going to be taking another few days off. My husband is headed to L.A. for work, and he really wants me to go with him. We live in Chico, California, which is 2 hours north of Sacramento. It truly is a great area, but the weather is so much more amazing in Southern California. Tomorrow we will start our 8 hour drive, and spend a few days down there. Day 8 is Metallic, and I should be able to post that on Wednesday. Anyway, unto Day 7.


Here's my left hand. This hand is 100% better than my right, because I am right handed. I used Jordana French Manicure in White as the base coat on my left hand and Kiss Nail Art Paint in Black for the paw prints and the kitty. For the top coat I used Seche Vite Fast Dry Top Coat ( I just bought this at CVS when I was purchasing the violet polish for day 6, and I am head over heals in love with Seche, I will never used another top coat again.)

To make the paw prints, I started with the biggest nail dotter I have, and I made a triangle out of dots. Two dots (connected) on the bottom, and one dot (connected) on the top, then just added dots 3dots around it to create the paw print. For the cat I painted a half circle on my nail, added the ears, let is dry then added the eyes, nose and color in the ear. I debated whiskers, but I didn't want to mess up my already cute kitty.

On to my right hand.


I wish the cat would have turned out better, it kind of looks more like a chinchilla. Haha. But it's really hard to place the dots correctly, when using my left hand. For the base coat, I used Sally Hansen's Color Quick in Black. For the paw prints and the cat I used Jordana French Manicure in White

I must say these are my favorite nails I've done for this challenge so far. I'm really glad I get to wear these for a few days on our trip to L.A. Speaking of which, I wore my frog nails (Day 4 - Green) to Reno for a few days and that was a mistake, my nails were stained a lovely green for a few days. So I guess my lesson is don't wear the Milani Neon without putting a base coat on first.

Anyway, Hope everyone has a wonderful weekend, and look for a new post next week. Also follow me on Pinterest, as I pin my posts there as well, and post ideas and products. 

Sunday, May 13, 2012

Day 4 - Green!

Green! I had so many ideas for green, and ultimately decided on frogs. I was originally going to paint my nails fully in the Pure Ice Wild Thing, and use a frog stamp. But I liked the idea of creating frogs with nail dotters. Here's my results.


I think they're cute, and I actually like that they're all a little different. The base coat is Milani Neon Fresh Teal, and although it looks really blue in this photo, it's more green in person. 


This is everything I used, from left to right: Kiss Nail Art Paint in Black (for the eyes and nose), The hot pink color is called Wild Thing (for the little cheek detail), it doesn't have a brand name, I got it for free from a text giveaway, then Pure Ice Wild Thing (for the frogs body), Milani Neon Fresh Teal as the base coat, Kiss Nail Art Paint in White, and then of course the nail dotter tool.

I am going to have to put Day 5 on hold, most likely until Wednesday or Thursday. As I've stated, my Husband travels for work and Monday he's going to Reno. We decided to make a mini trip of it and spend a night or two there. So stay tuned, Blue will be making an appearance later on in the week. 

Other than that I would like to wish all of those Mothers out there a very Happy Mother's Day! May you all be rewarded (even in little ways) for the tremendous work that you do. I hope, and pray to one day be apart of your group. 


Saturday, May 12, 2012

Day 3 - Yellow!

Alright, the first 2 days of this challenge have been quite challenging, but finally I have results I'm happy with! Yellow, only had one yellow polish, so that decision was easy. I liked the idea of the "cloud" tip idea I experimented with yesterday, but since that did not work out, I wanted to attempt it again.


I used Pure Ice, Excuse Me as the base coat. On the accent finger I used Sally Hansen's Color Quick, Fast Dry Nail Color Pen in Black, and Jordana French Manicure White. On the other nails I used Kleancolor Fun Shapes Aurora and there you have it! Quick, easy and I'm happy with the results. 


Day 2 - Orange Nails!

Alright, Day 2. Oh.My.Goodness. So much to say about Day 2! Day 2 is orange, and again I bit off more than I could chew, had high expectations and not great results. But tomorrow is a new day!


Before I get to the unfortunate events of today, I'll get into what I used. For the base coat I used Sally Hansen's  Hard as Nails Xtreme Wear, Sun Kissed, and I did the "cloud" tip in Milani Neon, Awesome Orange. In retrospect I should have used white polish on the "cloud" tip first before the Awesome Orange, because it took 7 coats to give it a slight contrast. 

Let me tell you 7 coats takes soooooo long to fully dry! I mistakenly only let the surface dry before painting on another coat, but patience is definitely not my best virtue. Anyway, the polish was think and still wet in the middle. Side Note: My husband works on call as a delivery driver whom delivers prescriptions to patients homes. He can get a delivery call any day between 8-5pm. Our day to day routine is extremely sporadic, and never goes according to plan. Today, 30 minutes after I finished my nails, my Husband got a delivery call in which he needed to leave immediately for. Great part about his job is he can take me with him on some deliveries, and this one was one of them. I was still very aware of my not fully dried nails, and cautious of very move I made. We shut our front door, get in the car and Jason realizes he forgot his wallet inside. Long story short the door latch on our front door swung into the lock position apparently from the movement of us shutting our door. We were completely locked out, and as I was attempting to pry open one of our windows I completely fudged up my nails. Beyond repair. As we were in a hurry, I had to sport embarrassing nails in public, but we did finally get in our house. Well worth the sacrifice. And at least I took a few photos before the travesty. 

Needless to say I started yellow early, because it would just be silly to try the orange again. Stayed tuned for the yellow tomorrow. 


Friday, May 11, 2012

Day 1 - Red nails

Day 1, and off to a rocky start! I only have 3 kinds of "red" polish. One is a super neon red, and two are more burgundy, merlot colors. So naturally I chose the two burgundy type that go well together. My husband and I have this thing, when either of us are doing a project and we bite off more than we can chew, we always say KISS (keep it simple stupid). Well, I wish my husband was home while I was doing my nails, because he would have reminded me to KISS.


 Anyway, I wanted to do a sort of half moon, but half way up my nail, so I used those reinforcement holes, used to reinforce binder paper holes. I used Wet n Wild, Wild Shine Burgundy Frost as the base coat. Once the base coat was completely dry, I put the reinforcement holes and painted the "tip" color with Pure Ice, Iced Merlot. After that I used SH10 Shany plate for the feather. In all actuality I shouldn't have used the stamp, I think it's too much, but it's only for a day, so c'est la vie!


Thursday, May 10, 2012

31 day Challenge

I finally got my Konad stamping polish! Thus, I have decided to do the 31 day Challenge. I can't promise to polish and post everyday, but I do promise to finish this challenge. For those who are not familiar with the 31 day challenge, I will post the list of each task below. This is exciting, and I hope it all goes according to plan. So here we go!


Sunday, May 6, 2012

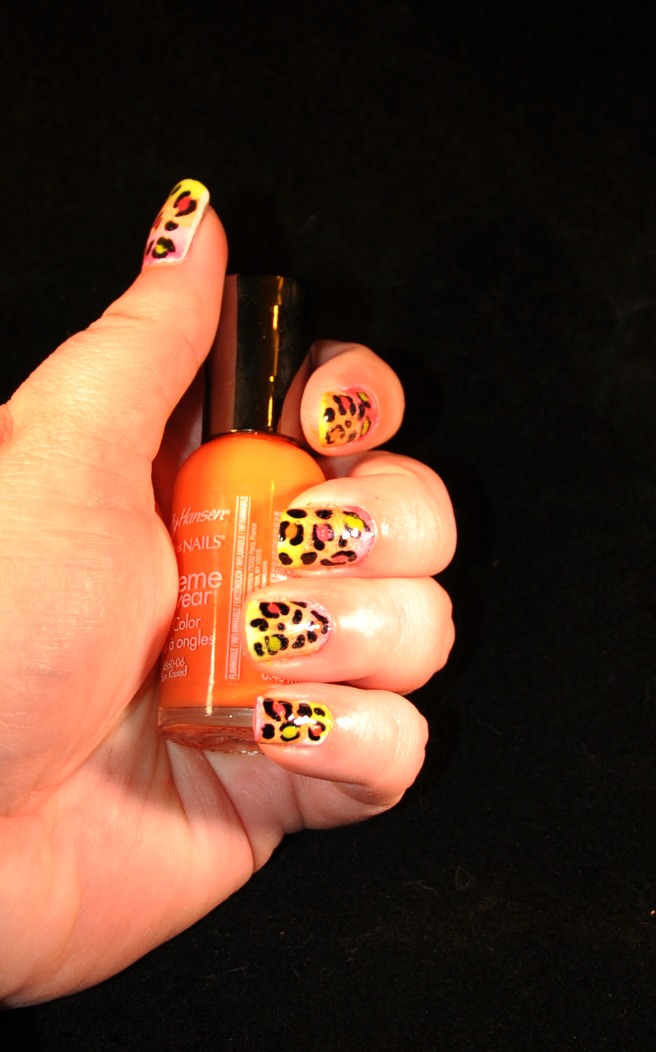
Colorful Leopard Nails

I got my nail dotting tools I ordered from Amazon.com yesterday, and I had to try them out. Trying to figure out what design to do with them was the hardest part, but finally I decided on leopard print. I truly LOVE the way they turned out, and the only issues I had was using my left hand to dot on the leopard print. I'm sure that will get easier, the more that I do it. Alright, now onto the fun part.. How I did it!


I started with Jordana 090 White, as a base coat. I only painted on one coat, because it's going to be covered up, so it was unnecessary to have it perfect. Let the base coat dry. I used the widest part of a cosmetic foam wedge, and painting three colors horizontally. Using Pure Ice Splash, Pure Ice Wild Thing and Sally Hansen Hard as Nails Xtreme Wear Sun Kissed. Then I pressed the wedge onto my nails, while re-applying the colors for each nail. This technique is a bit messy, so you may want to tape up the sides of your fingers to avoid paint on your skin. I have read that some women wet the foam wedge first, I found this to not be as effective as leaving it dry.


Once the gradient paint has dried, it was time to use those new dotting tools. I used Kiss Nail Art Paint in Black, dobbing a little on a scratch piece of paper, so that it's easier and more available to apply to the dotter. There's plenty of tutorials on youtube.com on how to create a leopard pattern. I glimpsed at one of them a few days ago, but really all that goes out the window once you start, you really have to gauge it for yourself. Add 3 to 5 incomplete circles on each nail, then fill in the gaps "spots". I used the same three colors to fill in the incomplete circles to complete the leopard patterns.

After letting it all dry, I used Sally Hansen's Strengthening Top Coat, as a top coat. I'm super happy with the end result, and will be rocking these nails until my Konad polish comes in!


Friday, May 4, 2012

Introduction.

Let me start out by introducing myself. My name is Jamie, born, raised and still reside in Northern California. I'm 29 years old, a wife and one of the many, many people whom lost employment due to this recession. I absolutely love photography, everything about it is extremely exciting to me. I also enjoy painting, crafting, and cooking. Pinterest is a dream come true for a gal like me! It has actually opened my eyes to all the possibilities my nails have! I had no idea how available products are to purchase to create beautiful nails at home, instead of spending 100's of dollars a month. I saw the Salon Express at Walmart a few weeks back, for $9.95, and figured it can't hurt to get it a shot. Well, I've been mildly successful a few times with it, but it advertises that it works with ANY nail polish. While that may be true if you lay down the polish, scrape the excess polish, stamp it onto the stamper and finally stamp it on your nail within, lets say, 10 seconds. Because if it's not rushed it dries and the effort is for nothing. So I went to the reviews, read what polishes work and am now anxiously awaiting the Konad stamping polishes I ordered from Amazon. I'm really excited to try nail stamping with the better stamping polish, especially since I also ordered the Shany 2012 nail art polish stamping too, so now I have so many options! I am a complete beginner to this, so follow me as I learn and discover new techniques and share my findings with you. Also follow me on Pinterest for my latest posts, and nail inspiration. Mind you, I just started the blog and the pinterest account, so please be patient. :)